How to Set up the L2TP VPN connection on Windows 10
Step 1. Click on the Network icon (tray icon) and then click on the Network Settings link.
Step 2. Click on VPN.

Step 3. Click on + Add a VPN Connection.
Step 4. Input the following:
Choose a Connection name: ex: OkayVPN L2PT

Input the Server Address, you can check servers at member area
VPN Type: Layer 2 Tunneling Protocol (L2PT).
.png "Windows10_L2TP")
Choose Username and password for Type of sign-in info.
Input your username and VPN password. Check your information at member area

Click Save.
.png "Windows10_PPTP")
Step 5. Click on Change adapter options..png "Windows10_L2PT")
Step 6. Right click on the newly added VPN adapter and click on Properties..png "Windows10_L2TP")
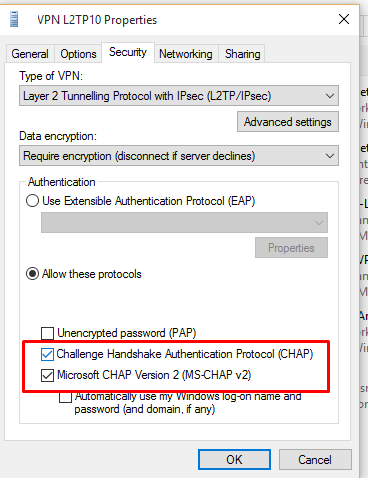
Step 7. Click on the Security tab.
.png "Windows10_L2TP")
Step 8. Under Data ecryption:
Choose Require encryption.

Step 9. Click on Advanced settings.

Step 10. Select Use pre-shared key for authentication:
Input key: okayvpn
Click OK.
.png "Windows10_L2PT")
Step 11. Check Allow these protocols:
Challenge Handshake Authentication Protocol
Microsoft CHAP Version 2
Click OK.
Step 12. In Network and Internet select the L2PT adapter (previously created) and click on Connect. You are now Connected!
Step 13. Check your IP , make sure you are connected.